1.修改屏幕驱动 从ft6236 (删掉,不要保留),改为下面的
路径:/home/wells/tina-v853-open/tina-v853-open/device/config/chips/v851s/configs/lizard/board.dts(注意路径,要设置为自己的实际路径)
ctp@38 {
        compatible = "focaltech,fts";
        reg = <0x38>;
        interrupt-parent = <&pio>;
        interrupts = <PH 13 IRQ_TYPE_LEVEL_LOW>;
        focaltech,reset-gpio = <&pio PH 14 GPIO_ACTIVE_HIGH>;
        focaltech,irq-gpio = <&pio PH 13 IRQ_TYPE_LEVEL_LOW>;
        focaltech,max-touch-number = <2>;
        focaltech,display-coords = <0 0 480 800>;
        status = "okay";
    };
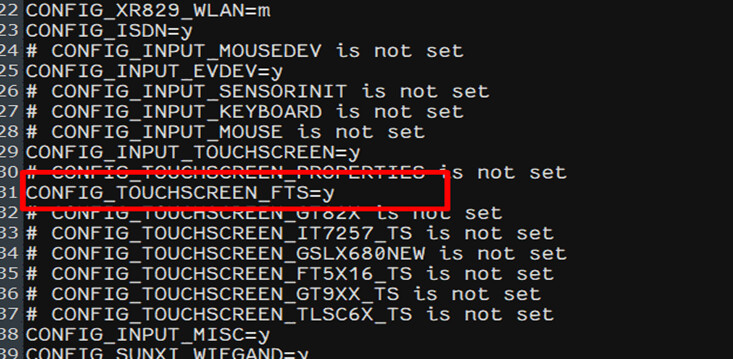
2.修改config
路径:/home/wells/tina-v853-open/tina-v853-open/device/config/chips/v851s/configs/lizard/linux-4.9/
原来:
现在
更换驱动
3.关闭自定义电源功能使能
修改路径:/home/wells/tina-v853-open/tina-v853-open/drivers/input/touchscreen/focaltech_touch/focaltech_config.h
从1改为0
#define FTS_POWER_SOURCE_CUST_EN 0
用于防止睡眠后唤醒触摸失灵,没反应。(没试过)
到此触摸可以运行.
触摸还有一个小问题,就是点左边,变成点右边!
修改文件,调换x 和 y的坐标即可
文件路径:
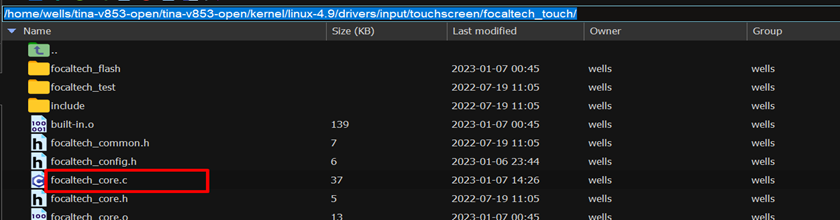
/home/wells/tina-v853-open/tina-v853-open/kernel/linux-4.9/drivers/input/touchscreen/focaltech_touch/
然后搜索REPORT 找到event 上报
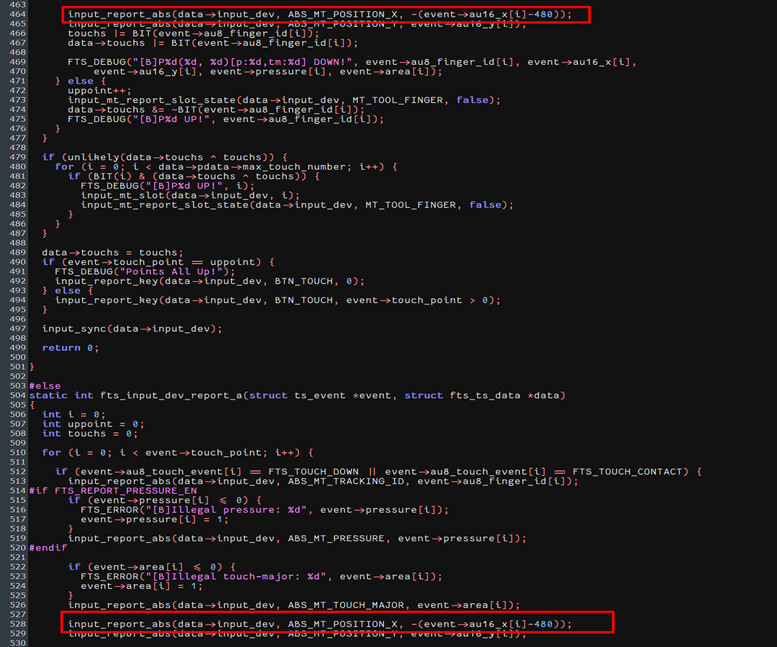
注意默认是适配竖屏的,所以X Y 是正确的,不是互换XY的位置就能解决触摸的问题。
正确的思路是保持Y不变。调整X的坐标。
解决办法:
只需要改一下两行代码就可以了
input_report_abs(data->input_dev, ABS_MT_POSITION_X, -(event->au16_x[i]-480));
jjwly
3
补充下使用泰山派屏
用的是Docker,
总结:
1、 硬件电路上,板上触屏6P接口是下接。由于放在底层。屏上线如果直接,应是上接。要使用反向连接线,才能正常工作。
2、 使用工具访问
使用工具i2cDetect可找到触屏,访问0x38
root@TinaLinux:/# i2cdump -y -f 2 0x38
0 1 2 3 4 5 6 7 8 9 a b c d e f 0123456789abcdef
00: 00 00 00 40 54 02 eb 00 00 ff ff ff ff ff ff ff …@T??..
10: ff ff ff ff ff ff ff ff ff ff ff ff ff ff ff ff …
20: ff ff ff ff ff ff ff ff ff ff ff ff ff ff ff ff …
30: ff ff ff ff ff ff ff ff ff ff ff ff ff ff ff ff …
40: 00 00 00 00 00 00 00 00 00 00 00 00 00 00 00 00 …
50: 00 00 00 00 00 00 00 00 00 00 00 00 00 00 00 00 …
60: 00 00 00 00 00 00 00 00 00 00 00 00 00 00 00 00 …
70: 00 00 00 00 00 00 00 00 00 00 00 00 00 00 00 00 …
80: 00 00 00 00 00 00 00 00 00 00 00 00 00 00 00 00 …
90: 00 00 00 00 00 00 00 00 00 00 00 00 00 00 00 00 …
a0: 00 00 00 54 00 00 16 00 8d 00 00 00 00 00 00 00 …T…?.?..
b0: 00 00 00 00 00 00 00 00 00 00 00 00 00 00 00 00 …
c0: 00 00 00 00 00 00 00 00 00 00 00 00 00 00 00 00 …
d0: 00 00 00 00 00 00 00 00 00 00 00 00 00 00 00 00 …
e0: 00 00 00 00 00 00 00 00 00 00 00 eb aa
3、 设备树与内核配置
a) 先是直接使用CST128,驱动加载没问题,但没有触发设备加载
cst128a@38 {
compatible = “hyn,cst128a”;
reg = <0x38>;
interrupt-parent = <&pio>;
interrupts = <PH 13 IRQ_TYPE_LEVEL_LOW>;
reset-gpios = <&pio PH 14 1 0 1 0>;
touchscreen-size-x = <480>;
touchscreen-size-y = <800>;
touchscreen-inverted-x;
};
放在TWi2下面。
改1010为0101,也不行。
b) 再使用fts,触发设备加载,导致崩。这个是楼主文章适配触屏内容
ctp@38 {
compatible = “focaltech,fts”;
reg = <0x38>;
interrupt-parent = <&pio>;
interrupts = <PH 13 IRQ_TYPE_LEVEL_LOW>;
focaltech,reset-gpio = <&pio PH 14 GPIO_ACTIVE_HIGH>;
focaltech,irq-gpio = <&pio PH 13 IRQ_TYPE_LEVEL_LOW>;
focaltech,max-touch-number = <2>;
focaltech,display-coords = <0 0 480 800>;
status = “okay”;
};
内核选FTS
c) 再使用ft6236,这个才可以工作。
内核选FT6236
ft6x06@38 {
compatible = “focaltech,ft6236”;
reg = <0x38>;
interrupt-parent = <&pio>;
interrupts = <PH 13 IRQ_TYPE_LEVEL_LOW>;
reset-gpios = <&pio PH 14 0 1 0 1>;
touchscreen-size-x = <480>;
touchscreen-size-y = <800>;
touchscreen-inverted-x;
};
4、 LvExmaple例子使用的触屏设备是/dev/input/touchscreen,而生成的设备是event0,使用下面命令建立软链接。
ln -s /dev/input/event0 /dev/input/touchscreen
2 个赞
shi
5
你好,请问触摸线反接是什么意思?你买的是哪一款屏幕啊